

Backup4all Monitor Version 1.x
Backup4all Monitor 1.2 released (June 8th, 2022)
Backup4all Monitor 1.2 was released, the most important update being the option to permanently activate a license.
You can download the updated version here: Backup4all Monitor 1.2

Here’s a full list of all changes in Backup4all Monitor 1.2:
- Added: Option to permanently activate a product key
- Updated: Estimated time column renamed
- Updated: Activation process redesign
- Fix: Change log path in Monitor did not move existing logs
- Fix: Monitor server did not start without installing the dashboard
About Backup4all Monitor
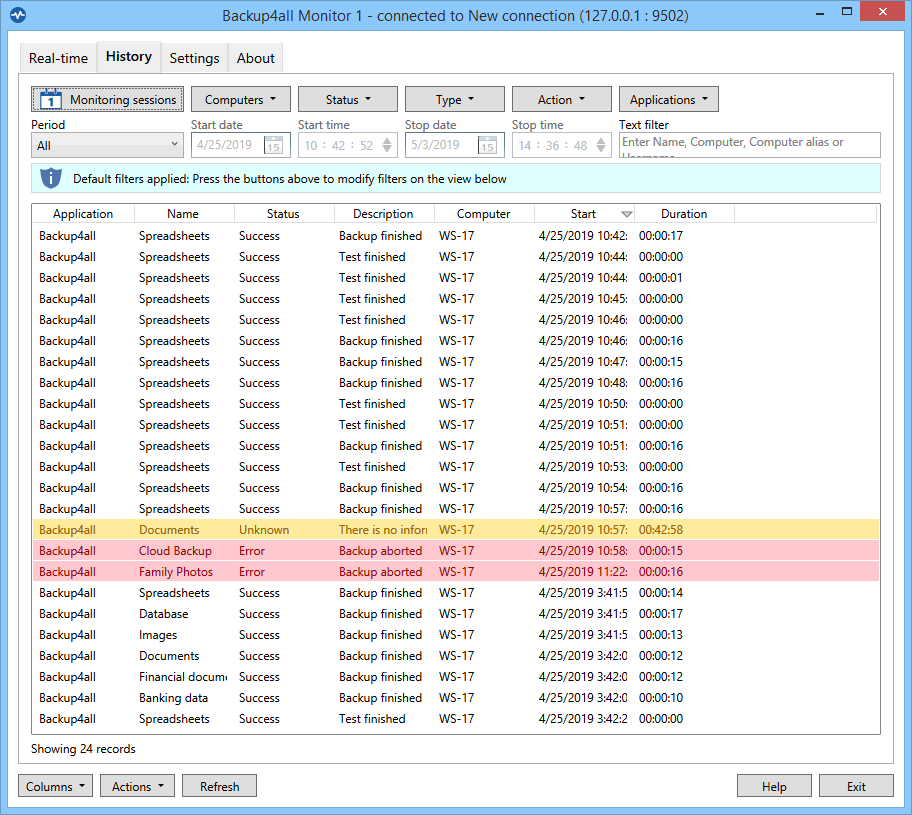
Backup4all Monitor is a new product that provides realtime and historical monitoring for actions executed by Backup4all on remote machines. You can monitor remotely backup/test/restore & cleanup job actions from any client computer that has Backup4all installed. This is a new product but requires and only works in connection with computers that have Backup4all installed.

The Backup4all Monitor has two components:
- Backup4all Monitor Server. The monitoring server gathers the monitoring information sent to it from all the client computers that have Backup4all installed and configured to send data. Only details about job actions are sent (backup, restore, test, cleanup). The server can be installed in your own network or on cloud servers such as Amazon S3/Azure.
- Backup4all Monitor Dashboard. The dashboard provides a graphical user interface for analyzing the data stored and managed by the Backup4all Monitor Server. It can be installed on the same computer as the monitor server, or on different computers as it’s able to connect remotely. The dashboard is free to use/distribute, thus you can install it on as many computers as you need.
To monitor the backups (& other actions) done by Backup4all, you have to configure it first.

Here are the steps needed to configure Backup4all for remote backup monitoring:
- Install the latest update for the Backup4all major version you own. Remote monitoring is available starting with Backup4all 8.1 or Backup4all 7.5 if you haven’t upgraded yet. Once you have the newest update installed for your version, open Backup4all.
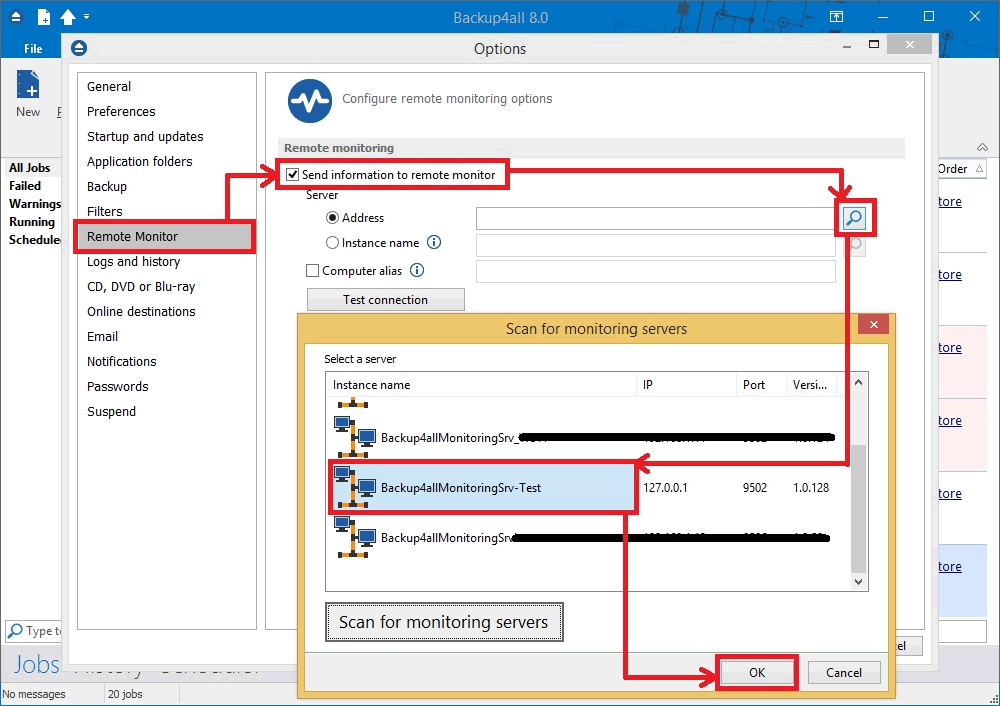
- Go to File->Options->Remote Monitor (if this option doesn’t show up, make sure you install the latest update of your Backup4all version)
- Enable the Send information to remote monitor option.
- Press the search icon from the Address field, to open Scan for monitoring servers window.
- Select the Instance name for the monitor you want to send backup information to, then press OK.
- In the Address field you can also manually enter the monitoring server’s IP followed by the port number and Instance name (example http://127.0.0.1:9502/Backup4allMonitoringSrv-Test)
- If the monitoring server is located in your network, you can use the Instance name field, where you must enter the name of the Instance for the monitoring server, or press the search button to scan the network. (example: Backup4allMonitoringSrv-Test)
- If you want to assign an alias for that computer, you can select the Computer alias option and type a name.
- When the remote monitor is selected, you can press the Test connection button and press OK.
You can try it for free for 30 days by downloading a trial version here: Backup4all Monitor 1.2
Backup4all Monitor 1.1 released (December 17th, 2019)
Backup4all Monitor 1.1 was released, with improvements to license management and other important fixes. You can download the updated version here: Backup4all Monitor 1.1 Here’s a full list of all changes in Backup4all Monitor 1.1:
- Fix: License Management issue when using un-license or license buttons
- Fix: Occasional activation errors
- Fix: Add product name to db and queries to avoid duplicate logging
- Fix: Update check changes
- Fix: Automatic reactivation
About Backup4all Monitor
Backup4all Monitor is a new product that provides realtime and historical monitoring for actions executed by Backup4all on remote machines. You can monitor remotely backup/test/restore & cleanup job actions from any client computer that has Backup4all installed. This is a new product but requires and only works in connection with computers that have Backup4all installed.
The Backup4all Monitor has two components:
- Backup4all Monitor Server. The monitoring server gathers the monitoring information sent to it from all the client computers that have Backup4all installed and configured to send data. Only details about job actions are sent (backup, restore, test, cleanup). The server can be installed in your own network or on cloud servers such as Amazon S3/Azure.
- Backup4all Monitor Dashboard. The dashboard provides a graphical user interface for analyzing the data stored and managed by the Backup4all Monitor Server. It can be installed on the same computer as the monitor server, or on different computers as it’s able to connect remotely. The dashboard is free to use/distribute, thus you can install it on as many computers as you need.
To monitor the backups (& other actions) done by Backup4all, you have to configure it first.
Here are the steps needed to configure Backup4all for remote backup monitoring:
- Install the latest update for the Backup4all major version you own. Remote monitoring is available starting with Backup4all 8.1 or Backup4all 7.5 if you haven’t upgraded yet. Once you have the newest update installed for your version, open Backup4all.
- Go to File->Options->Remote Monitor (if this option doesn’t show up, make sure you install the latest update of your Backup4all version)
- Enable the Send information to remote monitor option.
- Press the search icon from the Address field, to open Scan for monitoring servers window.
- Select the Instance name for the monitor you want to send backup information to, then press OK.
- In the Address field you can also manually enter the monitoring server’s IP followed by the port number and Instance name (example http://127.0.0.1:9502/Backup4allMonitoringSrv-Test)
- If the monitoring server is located in your network, you can use the Instance name field, where you must enter the name of the Instance for the monitoring server, or press the search button to scan the network. (example: Backup4allMonitoringSrv-Test)
- If you want to assign an alias for that computer, you can select the Computer alias option and type a name.
- When the remote monitor is selected, you can press the Test connection button and press OK.
You can try it for free for 30 days by downloading a trial version here: Backup4all Monitor 1.1
Backup4all Monitor 1.0 released (June 25th, 2019)
Backup4all Monitor is a new product that provides realtime and historical monitoring for actions executed by Backup4all on remote machines. You can monitor remotely backup/test/restore & cleanup job actions from any client computer that has Backup4all installed. This is a new product but requires and only works in connection with computers that have Backup4all installed.
Backup4all Monitor is compatible with the following operating systems: Windows 10, 8, 7, Vista, Server 2016/2012/2008 (32/64-bits). It requires approximately 100MB of free disk space.
The Backup4all Monitor has two components:
- Backup4all Monitor Server. The monitoring server gathers the monitoring information sent to it from all the client computers that have Backup4all installed and configured to send data. Only details about job actions are sent (backup, restore, test, cleanup). The server can be installed in your own network or on cloud servers such as Amazon S3/Azure.
- Backup4all Monitor Dashboard. The dashboard provides a graphical user interface for analyzing the data stored and managed by the Backup4all Monitor Server. It can be installed on the same computer as the monitor server, or on different computers as it’s able to connect remotely. The dashboard is free to use/distribute, thus you can install it on as many computers as you need.
To monitor the backups (& other actions) done by Backup4all, you have to configure it first.
Here are the steps needed to configure Backup4all for remote backup monitoring:
- Install the latest update for the Backup4all major version you own. Remote monitoring is available starting with Backup4all 8.1 or Backup4all 7.5 if you haven’t upgraded yet. Once you have the newest update installed for your version, open Backup4all.
- Go to File->Options->Remote Monitor (if this option doesn’t show up, make sure you install the latest update of your Backup4all version)
- Enable the Send information to remote monitor option.
- Press the search icon from the Address field, to open Scan for monitoring servers window.
- Select the Instance name for the monitor you want to send backup information to, then press OK.
- In the Address field you can also manually enter the monitoring server’s IP followed by the port number and Instance name (example http://127.0.0.1:9502/Backup4allMonitoringSrv-Test)
- If the monitoring server is located in your network, you can use the Instance name field, where you must enter the name of the Instance for the monitoring server, or press the search button to scan the network. (example: Backup4allMonitoringSrv-Test)
- If you want to assign an alias for that computer, you can select the Computer alias option and type a name.
- When the remote monitor is selected, you can press the Test connection button and press OK.
You can try it for free for 30 days by downloading a trial version here: Backup4all Monitor 1